
Launch the ArGest Backup UI application on your system.
ArGest Backup supports the use of Standalone Tape drives, Tape Libraries – sometimes referred to as Autoloaders, and disk-based archives.
Once launched, you will be stepped through the Quick Configuration settings.

QuickConfig Dialog
Choose the Destination option that is correct for your environment.
For this exercise, click the “Next” button and set the Default Backup for the “Disk-based Archive” location. You may change this to a Standalone Tape drive or Tape Library Destination once you have completed this Quick Start. These defaults will automatically be used each time you execute a backup job, but they may be changed on a job-by-job basis or by relaunching the QuickConfig or full Preferences dialogs.

QuickConfig – Default Archive Destination
If you do not have a tape device available, your only option will be to select a Disk-based archive. If you are working with Disk-based archives, accept the default settings and the example archive will be created in your Documents folder:

QuickConfig – Disk-based Archive Settings
Once the basic configuration is completed, you will be shown the Backup Wizard mode window. This is one of two paths to creating archival or backup jobs and is designed to step you through the setup and execution of a job in a manner that removes any IT-specific knowledge requirement.

Wizard Dialog
For this demo, click the “Archive/Backup” button to move to the next step which is to either create a new job, or select from a previously saved job definition.

Select Project Step
On this panel, you may select from a listing of previously saved jobs, or click the “Start New Project” cog folder to start a New Project. In a new installation, you will not have any saved jobs, so click the cog folder button to start a new job.

Add Content Panel
In this panel, you will define what will be included in the job, or “backed up”. Adding volumes, folders, or files is as simple as dragging them from your system’s file browser – Finder, Explorer, Nemo, etc. – and dropping them into the “Included Items” list.
Find a small folder containing a few hundred megabytes of data – for this example on Linux, we’ve chosen a folder on a shared, mounted media volume

Adding Content for Backup
To determine how much space or how many tapes your selected data will require, click the “How Many Tapes” button.
Click the “Next” button to move to the tape and archive naming step using the default destination that you selected in the QuickConfig steps above.

Contents added for Archive
Clicking the “Next” button will step to the Summary page and run an Estimate pass on the selected data. Note that the numbers shown are BRU Archive Size and will be larger than your selected data. Also, if you are using tape, the Estimate pass will report the number of tapes for your drive type and the previous generation since all LTO drives can write to tapes from the previous generation.

Estimate Report
Closing the Estimate dialog will display the Summary page.

Job Summary Page
If you are satisfied with the settings as presented, simply click the “Start” button and your job will be executed.

Write and Verify Dialog
Once the write and verify completes, the job Completion dialog will be displayed.
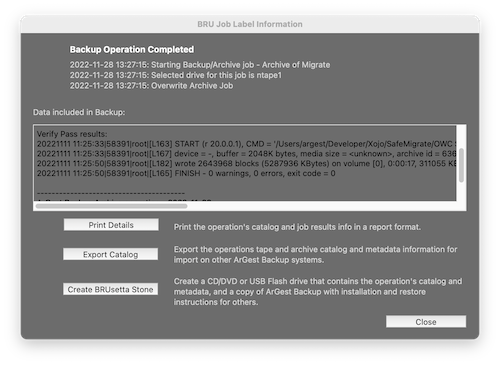
Job Completion Dialog
Click the “Close” button to return to the Wizard for now. The options will be discussed later in this manual.